Archives for October 2009

Phase Cancellation

Just finished a voice over recording session for a radio play. The play will be on an upcoming CD release for the heavy metal group, Butcher. The voice over was performed by two actors spaced 3 feet apart, facing each other. The large diaphram condensor mics were set to a cardioid pattern, but of course there was considerable bleed between the two.

I used a U87a on the female actor’s voice, and a Michael Joly modded MXL V67 on the male’s voice, each recorded to separate mono tracks in SONAR. The U87 was clear and powerful, full of presence, as I expected, but the sound from the V67 was thin and hollow sounding, which I noticed only when playing both tracks back together. This was not what I was expecting from the Joly modified V67.

Then it hit me! The bleed into the U87, being 3 feet away, was introducing a 3 ms partial phase cancellation for the male actors voice, when listening to the U87 track.

Its about 1 millisecond delay per foot of separation, that’s recording 101 for you. And yes it was considerably noticeable. However when I muted the U87 track and listened to the male actor voice soloed, it sound very good. Not U87 good, mind you, but much better. Considering the V67 is a $300 mic (after the Joly mods), it holds up well as a 2nd stringer to the U87.

So rather than try a different mic I just dealt with the phase cancellation in the DAW, when mixing. Its a simple matter to edit the tracks to eliminate the bleed, as long as the two voices are reading distinct parts and not talking over each other. Fortunately that is the case for this script, just a few places where you will hear both voices together.

Being out of phase is something that recording engineers really need to pay attention two, especially for vocals, when recording with multiple mics. Having better isolation also helps, but I did not have the room nor the available “gobos”. I might have used one of Ethan Winer’s Real Traps Portable Vocal Booths in this situation, but I wanted the talent to face each other as they were carrying on a “conversation”.

I will post some examples of this partial phase cancellation for anyone to hear, so you know what I mean.
Calibrating the console

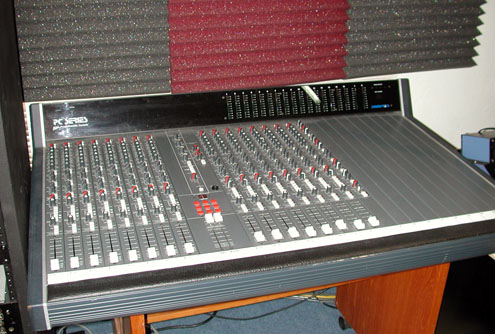
Soundtracs PC Midi Console

Soundtracs PC Midi Console

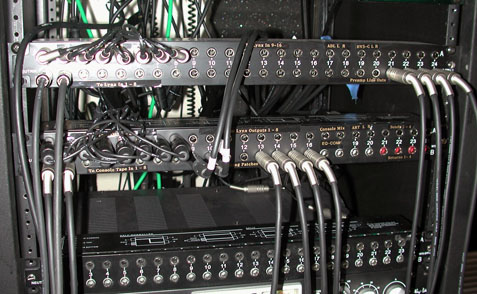
So on to calibrating the console. This was more of an attempt to see if there were any level differences between any of the 16 channels. I have an older Soundtracs PC Midi 16, which was originally manufactured in Great Britain in the 80’s. This is a large, heavy beast for just having 16 channels, but I like the sound I get. However being an older console its important to check to see if any of the capacitors (caps) are wearing out, if there are wiring problems, etc. I have not opened it up to inspect it (yet), so for now I am just going to run signal into it and see if I can hear any major problems with any of the channels. Since I record both ITB (In the Box) and OTB, using the console, I have spent some time rigging a series of patch bays which will allow me to easily switch between recording to tape and to the DAW, as well to configure how the output from the DAW is routed. Normally I route a stereo pair of outputs from the Lynx Aurora convertors to my Central Stations monitor controller. When I want to use the console for analog summing, as well as to take advantage of mixing using real faders, EQ, etc., I patch all 16 channels out of the Lynx into each of the 16 Tape Inputs of the console, using the patch bay. I have rigged a pair of 8-channel snakes, one set for the outputs, and one for the inputs, into the patch bay, so switching my routing patches is pretty easy and fast.
Patch Bays

Patch Bays

So I set up the console to take in all 16 channels from the Lynx, and played the Pink Noise signal through each. The levels on all but channels 15 and 16 matched perfectly, showing about +3 dB on the LED meters. I then adjusted the master faders until the stereo output was set to show 0 dB on the master output meter LED. This is not exact, using these LED’s but its close enough so that now I have a good reference level. The setting of the master faders is about -6 dB to attain 0 on the output. I have not actually measured any electrical signal levels, yet, which is what I would need to do to get a better calibration. I did find something interesting in channels 15 and 16. They were considerably hotter than 1-14, by about 10 dB. This led me at first to conclude that something bad had happened to the channel electronics. However, the difference was the same for both channels, not a likely occurrence. So I patched the 16 input into 14, and, yep the same level difference was noted on the meters. So this was coming from the DAW! So fired up the Lynx Aurora mixer software, and noticed nothing amiss in the soft fader settings, they were all set at 0 (max). Now this software mixer is not the most intuitive piece of soft kit, so rather than try to figure out why the last two channels were hot, I hit the software factory reset, and that fixed it! The levels are now the same across all of the 16 channels of the console. So the lesson is, don’t blame the old guy. Sometimes you have to spank the baby. Ok, bad analogy. But don’t blame the hardware, which could lead you down a path of big expense and waste of time, before you check to make sure your output from the computer is set correctly.

Standing Stones of Beara

Good for background music — and foreground music
Reviewer: Martha Retallick
True confession: I recently made several hundred cold calls to drum up business for my design studio. If you’ve ever cold-called, you know how stressful it can be. So, to calm my nerves, I had “Standing Stones” playing softly in the background. It REALLY helped. And Jim, you’ll be happy to know that your music just helped me land a new client. Thank you! Now it’s time to put the CD back in the player, turn up the volume, and dance around the living room…