Adventures in Mixing

Two months ago I decided I needed a new DAW (Digital Audio Workstation) for my music production. This began a long process, starting with ordering a new hotrod system from Chris Ludwig at FundamentalAV.com. I had worked with Chris 5 years ago when he was with ADK Pro Audio in Kentucky. The new DAW is amazing, incredibly fast, with SSD drives, 11th-gen iCore7 processor, 32 meg. ram, and the most up to date Windows 10 Pro. That was a start.

After another several weeks and considerable labor, I had reinstalled the latest versions of my many audio applications including Cubase 11, Wavelab 10, hundreds of plugins and a raft of virtual instruments. Everything worked perfectly, well mostly everything.

Not being satisfied, naturally, I considered upgrading my monitor speakers. I still have a decent set of Meyer HD-1 main monitors but wanted something more precise for close in, near-field monitoring. I was looking at the higher-end Genelec SAM DSP-powered monitors with room correction, but could not justify the $5000+ cost. Instead I read great reviews for the inexpensive KALI IN-8 MKII studio monitors, at under $900 for the pair! Now these are installed and provide excellent point source imaging and detail. The Meyer’s are aimed more into the room behind my mix position, mainly for clients. The Kali’s I now use for mix decisions and run these at lower volumes. Happiness, until….

I began remixing Less Than Nobody, a song I wrote to support my wife Lynn’s new novel, Measured Time (which mentions a movie titled Less Than Nobody, about the angst of a Vietnam-era vet in a coffee shop, another story for another day). The original version of LTN sounded pretty good but several critical listeners pointed out that, as a rock song, the tempo was not consistent and this got in the way of their enjoyment of the groove. Being mostly an acoustic, free-form player, I had to agree, as I did not record this to a click track. In fact when I sent the song off to a drummer who, for $100, would record a great drum part, he declined after listening to it, saying, “was this not recorded to a click? I can’t work with this…” – Well, phooey!

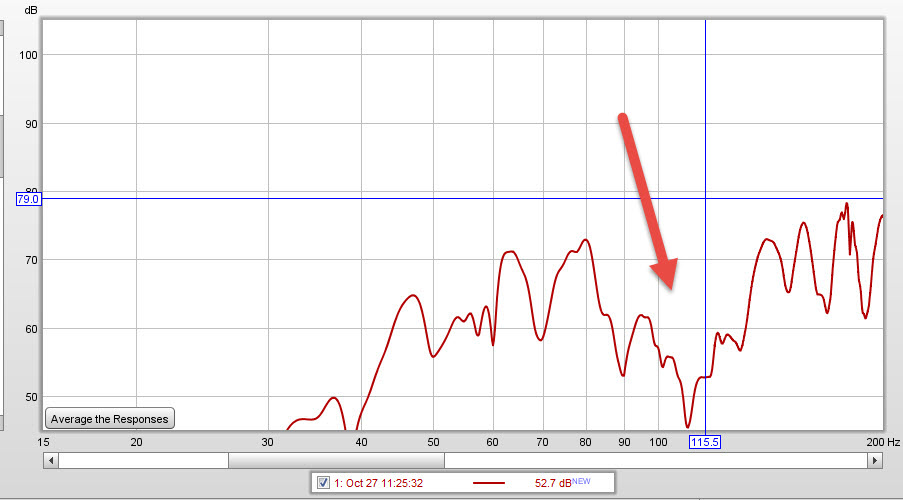
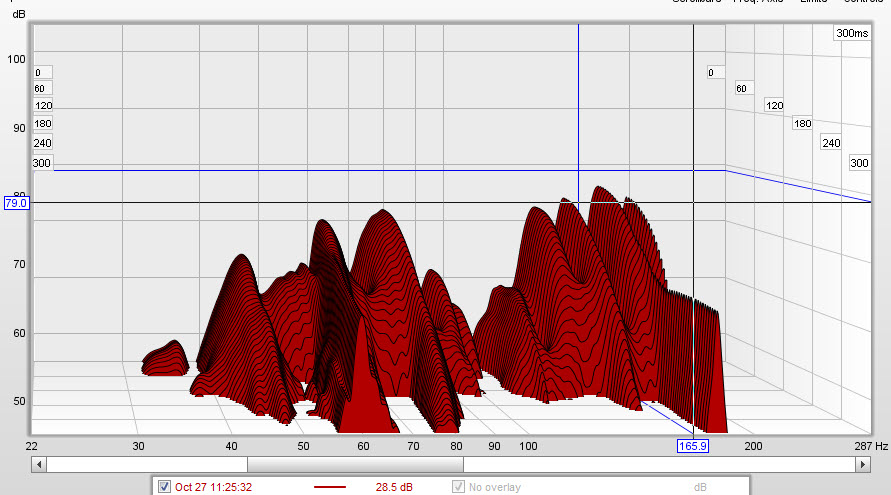
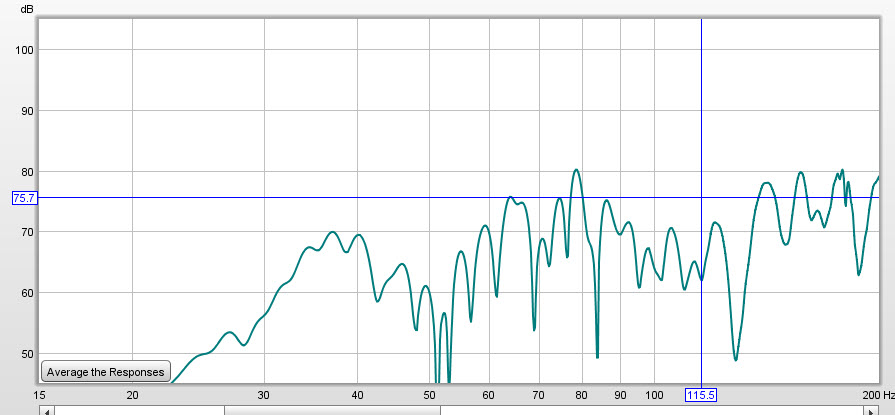
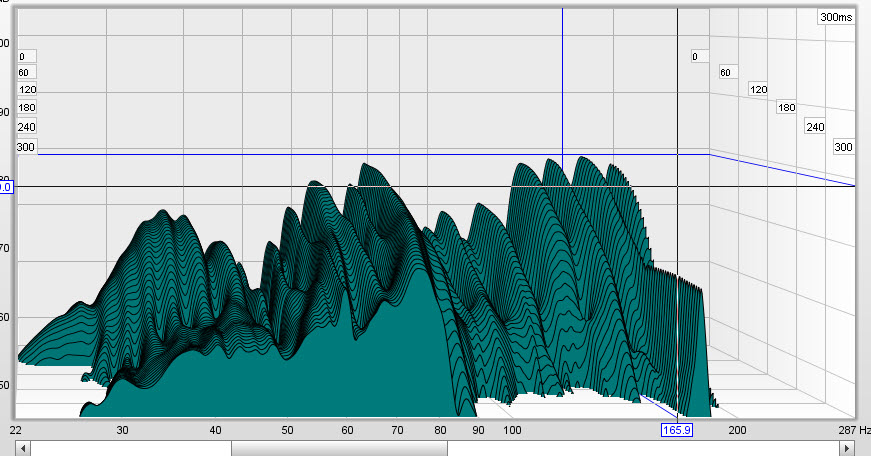
Listening with my newly acquired precision monitors, I had to agree that if I am going to do a rock song, a consistent tempo would be a necessity. I pulled up the Cubase project from a year ago, and began re-recording the guitar and bass parts, while listening to a click track in the headphones. I added more consistent drum grooves using BFD3. It was sounding more like a proper rock song, except for….. what’s that? Distortion? No matter how I adjusted the mix, the newly recorded tracks exhibited mild to annoying levels of nasty distortion, mainly when the bass or vocal tracks were playing. The wave forms did not look clipped, and in fact I had used conservative levels when recording the mic’d up amp.

I started to think I had made a mistake with the Kali’s, because being so inexpensive, could they be faulty? Could they not handle the levels (not very loud) that I was sending. Or was there an issue with room resonance? Or my recording technique? This bugged me for several weeks. Friends who came over to listen noticed the problem as well, not only in this but in other songs. Bummer!

Finally I stopped thinking about all of the new gear and what might be wrong with it, and thought about my signal chain. I knew from past experience that good sound was all about gain staging, making sure nothing was overly loud or even clipping. What I was hearing did sound like digital clipping. Fortunately I have some really nice Dorrough analog loudness meters that show the level that is actually going to the monitors, as opposed to the digital level meters in Cubase, which showed nominal levels. What could I have overlooked?

Max Headroom! – Or rather, NO HEADROOM. I opened the Lynx mixer application that stands between the output of Cubase and the input to my digital to analog convertors, part of the signal chain the feeds the speakers. All of the faders in this innocuous, mostly out of sight application, were set to max! Yikes, no wonder the Dorroughs were pegging into the red! How could I have overlooked them?

Maybe because I was focusing on the metering and waveforms in the DAW’s UI and not the entire signal chain. Maybe because I was having second thoughts on the recent purchases, or the several grand spent on a new computer. I fact, I was missing the most obvious and fundamental part of my setup – the gain staging of the entire signal chain.

Turning down the faders on the Lynx Mixer by 10 dB restored the headroom that I used to have before I embarked on setting up this new system.

LESSON LEARNED – Less Than Nobody (V.2) is finally sounding like something somebody will want to hear! Stay tuned for a new Soundcloud link.

Is Vinyl Better than Digital?

A recent NY Times article, Digital Culture, Meet Analog Fever discusses the recent fascination with more retro analog devices and media, in particular vinyl records. There is an ongoing dialog on the gear forums about the superior of one format or the other, which is really not the point. Vinyl, as an example, is a trend that is the result of a new generation discovering the sound and superior physicality of a record album. For us boomers that is not news, but one may ask what is behind this resurgence? Vinyl manufacturing plants, like United Record Pressing in Nashville, which I have visited twice, are running 24 x 7 these days.
United Record Pressing

United Record Pressing

So is analog vinyl really superior to digital music files?  In the case of mp3’s the compressed audio format degrades audio fidelity to a degree, although not many users can tell the difference between a compressed and lossless file format. Vinyl requires some roll-off  of the low end frequencies to avoid the needle jumping out of the groove on loud passages. What remains is somewhat band limited but faithful to the frequencies in a way that digital can come very close to and in many ways exceeds.  So why do some people prefer vinyl?
  1. To many it sounds better. If you grew up with it you know THAT sound, and prefer it over the exacting and sometimes overly clinical digital recordings.
  2. If you did not grow up with it, its a new thing that offers a tangible product, something you can show off if you are in a band. And it sounds better than MP3’s played through ear-buds.
  3. There is more room for liner notes and info about the band or recording that you can typically get onto a CD jacket.
  4. It’s cool, trendy.
The downsides:
  1. More expensive to manufacture, typically, 3-4X more costly than doing CD’s
  2. Somewhat limited frequency response, especially in the bass region
  3. Tendency for pops, ticks, hiss, and of course the dreaded skip when a groove is damaged. Some people like this so much that plugins have been devised that simulate bad vinyl!  Really, and I have one…
  4. LP’s in particular store fewer tracks than CD’s, typically no more than about 40 minutes total. CD’s can get up to 70+ minutes.
  5. Difficult to get into digital form unless a download card is included in the packaging (you see this more often now)
  6. Requires an old school stereo system and turntable with a RIAA balanced input, or a turntable with RIAA built in.

DiskcutterJim_s

Disc Cutter at Welcome to 1979 studio in Nashville.


RIAA equalization is a little known aspect of vinyl, explained here in a Wikipedia article:

RIAA equalization is a form of pre-emphasis on recording and de-emphasis on playback. A recording is made with the low frequencies reduced and the high frequencies boosted, and on playback the opposite occurs. The net result is a flat frequency response, but with attenuation of high frequency noise such as hiss and clicks that arise from the recording medium. Reducing the low frequencies also limits the excursions the cutter needs to make when cutting a groove. Groove width is thus reduced, allowing more grooves to fit into a given surface area, permitting longer recording times. This also reduces physical stresses on the stylus which might otherwise cause distortion or groove damage during playback.

A potential drawback of the system is that rumble from the playback turntable‘s drive mechanism is amplified by the low frequency boost that occurs on playback. Players must therefore be designed to limit rumble, more so than if RIAA equalization did not occur.”

There is an even more “trendy” approach of doing studio recording direct to vinyl, without any digital intervention. That requires taking the stereo mix from the mixer or console, directly to a vinyl cutting machine, in real time.  Each master disc costs around $150.00, versus $< $1.00 for a CD. The band has to play perfectly, and there are no re-takes or editing. I would call this “extreme recording”, not for the faint of heart or the lesser of chops.

So really the issue comes down not vinyl versus CD, as each has their pros and cons.  Unless you really want to spend the extra money, you will stop at the CD level, maybe with some MP3’s thrown in for your web site.

Instead, how can we best integrate analog sound into digital recordings to get the best sound out of digital, regardless if the final product is vinyl or CD?  The answer for many audio engineers today is a “hybrid” studio setup, which I have discussed before in an earlier blog post. A professional hybrid setup offers the following:
  1. Really high quality microphones recording into high quality preamps and other outboard gear such as compressors and EQ’s.  Tube preamps are often preferred here, depending on the sound source, voice timbre, etc. The idea here is to capture it in the best analog sound up front.
  2. High quality analog to digital conversion going into the DAW (Digital Audio Workstation, AKA the computer), so that the sound is not degraded. This is not hard to do these days as the cost of A-D conversion has come down significantly. Some would argue that typical computer sound cards such as the Sound Blaster are sufficient, but I disagree mostly because they are very limited in what they offer for inputs, in addition to having inferior clocking which can influence the sound to a degree.
  3. Mixing tracks via an outboard analog “mix bus” or chain of, again, high quality tube or solid state EQ’s and compressors before doing one more D-A back into the master stereo track. This involves both analog “summing” of the individual digital tracks using a console or some other outboard device that takes however many tracks are in the recording and sums them down electrically to a stereo master track. Some engineers would say that staying ITB (In the Box, i.e. no round trip to the analog domain during mixing) is better.  It really depends on how you work, but I prefer the outboard mixing approach before applying any plugins ITB, if at all. I just prefer what my analog outboard gear brings to the mixing process, and it’s often easier and more consistent than using plugins (albeit more expensive initially).
If the final product will be produced on CD we will master using 24 bit files for headroom. For CD we will need the master to be at the Red Book standard 44.1 KHz sample rate, dithered down to 16 bits as the last step. Often engineers will mix and make the analog round trip at high sample rates such as 96.1 KHz and then down-sample for CD. This requires a very fast computer and lots of disk space, but fortunately that is much easier to obtain these days.

If the final product will be on vinyl, an extra mastering step is required to attenuate the extreme highs and lows, as needed, before sending the master disk to the cutting engineer. This takes much skill, and there is a small but growing cadre of young, professional vinyl mastering engineers that are servicing the trendy LP market.

So the take away is, not all digital is created equal! Adding a bit of analog spice makes the final dish taste better, to mix my metaphors (pun intended).


Fixing a hole in the ocean

Mixing songs with bass content has always been problematic for me. Often when I do a mix where I thought I had hit the sweet spot with a bass guitar or bass synth pad, once I listened on my home or car stereo it was boomy. I recently put in some high end speakers, Meyer HD-1’s to replace my bass light Genelec 8040a’s, thinking that might fix the problem. Well they helped certainly, but in the process I unplugged my sub-woofer thinking I would not need it any more. So hear I am again, chasing the gear tiger, trying to get my mixes tight in the low end.
So it was with great interest that I read an article by Carl Tatz in the Nov. 2015 Sound-On-Sound, one of my favorite recording magazines. I have been following Carl’s newsletters about his Phantom Focus system with some interest, but felt that this level of acoustic treatment was way beyond my budge or needs. What caught my attention in this article was the simple fix for a hole in the bass response that is due not to speakers, but to the cancellations that occur when speakers are mounted on stands near the mixing desk. In my instance I have the Meyer’s on acoustic isolated stands positioned for near field monitoring, as shown here.

Studio with Meyers and REW setup3 Looking at the frequency plot in Carl’s article I saw the big dip in the bass response from around 63-125 Hz, which is a critical range for low bass frequencies. What is happening is cancellation of frequencies due to the bouncing around of the low bass from the floor, ceiling, mixing desk, basically a chaotic environment at the critical listening position and very difficult if not impossible to fix using acoustic treatment without spending big bucks. I had already invested around $4000 in bass traps, absorbers on the walls and ceilings, and diffusors for the live end of my long, narrow studio space. I was hoping to find an easier fix, and this article provides it. The secret to fixing the hole in the ocean of audio is, SUB-WOOFERS. The rationale is that a sub can “fill in” those problematic frequency areas when set correctly for sufficient loudness and frequency crossover. That being the clue I was looking for, I pulled out my lap top with the free Room EQ Wizard program, set up and calibrated by Galaxy CM-140 SPL meter which has an output that can be fed into the computer for measurement purposes, and because taking measurements. I was mainly interested in sweeping the low end, so I accepted the default range of 200 Hz and below. Here is what I got without a sub-woofer.  The red arrow shows clearly the “hole” in the bass response from about 90 – 120 Hz, very similar to what Carl talked about in his article. no sub
This can be visualized nicely as a waterfall plot. The “hole in the ocean” is pretty obvious above 90 Hz. That is what has been messing with my mixes!  Time to fill it in. no sub waterfall So next I dug out my trusty KRK Sub-Woofer, hooked it up in line with the Meyers using a high pass filter set at 80 Hz. That means that the sub will put out the majority of the bass frequencies below 80 Hz, effectively bolstering the low end. I did not want to set the cross-over too high because the Meyers have a pretty decent bass response as well, and I am not looking to shake the room. After experimenting I set the relative level on the sub to +3 dB, and ran some tests, playing around with the cross-over and sub level. The results are shown here: sub 80 hz xver sub 80 hz xver waterfall Looks like most of the hole is filled in now. I will continue to experiment with the best settings for the sub, but for now I am excited this solution actually worked. Thanks to Carl Tatz for his great and very useful article.

Shedding the Past

So I have this great old (vintage 1973) Otari MX7800 1″ reel to reel deck that I have used sparingly over the past few years (Lynn calls it Godzilla because its the largest piece of pro audio gear I own, weighing in at about 250 lbs.). It sounds great but takes a bit of TLC. New 1″ tape is not cheap, about $150.00 per reel, and I am grateful that it is still available from places like ATR.

The beast, Godzilla

The beast, Godzilla

So when I found 5 reels of used 1″ Ampex 456 Grand Master Tape for $30.00 per reel shipped from Canada, I said, hey that sounds like a helluva deal, right? Tapes arrived today and I put one on with the intention of erasing the old program material. These apparently were used at a television station in Ontario, Canada but the owner did not know how old they were or what kind of condition they were in. I decided to take a chance.

After about 10 minutes of running the first reel through Godzilla, the old lady started slowing down, slowing, slowing, until eventually she would not rewind or fast forward, and could barely run the tape at play speed. I was of course alarmed, thinking that some part had finally failed, some obscure capacitor or relay was fried, and the closest repair depot for tape machines was, of course, in Denver!

After a few frantic calls I was able to get back with Mike Everhart, a very talented engineer and audio tech in Portland OR. Mike had been the tech for this machine for a while when it was owned by Jordan Richter, a young Portland recording engineer. Jordan had sold me the machine back in 2007 I think it was. This old lady has a storied past, previously owned by the famous American punk band, Sleater-Kinney (with Carrie Brownstein from Portlandia no less).

When I arrived in Portland to pick it up Mike was there still doing some last minute tinkering! Talk about dedicated. Anyway to make a short story longer, Mike walked me through some basic questions over the phone and told me that old Ampex 456 formulations were very prone to excessive SHEDDING due to a breakdown in the tape chemical adhesive over time. This causes a buildup of brown gunk over the tape guides and heads, which was immediately apparent once I removed the tape. Mike suggested I thoroughly clean the guides and heads and try again with some newer tape. Brilliant, KISS is the lesson here.

Yes that worked, of course, now Godzilla is cranking along running newer tape just fine. Sometimes vintage is great, sometimes old stuff is just old, and you learn the hard way. Fortunately the price was not too dear this time. Now its time to Shred, not Shed!

PONO nono?

There has been quite a buzz lately about Neil Young’s new PONO compact audio player that promises to deliver 192 KHz sample rate audio, which is a much higher rate than most studios use for recording or mixing.
Young claims he can clearly hear the difference. But between what? An mp3, sure. But that is not the whole story.

Here is a great little article (albeit a marketing piece for Benchmark, a company whose converters is use daily). This dispels some of the hype involving high resolution recording.

What Is High Resolution Audio?

My take is that a high resolution audio player is a welcome addition to the market, but it is not necessary to use the computer resources necessary to record at 192 kHz sample rate. More than sufficient is 96 kHz (24 bit), and even that might be overkill. Yes I can hear the difference between 16 bit CD quality (44.1 kHz) and high resolutions. I would welcome a player that allows me to hear my masters recorded and mixed to 88.1 kHz or 96 KHz at 24 bit, so they sound like they do in the studio, and that is what it’s all about, right? Anyway the future of audio delivery is about streaming high resolution formats anyway, so bring it on!

The Magic of the Minimum Dose

I have been taking an online professional mixing class from Audio Master Class out of England, and it has been quite an eye opener for me. I have completed 11 of 12 modules, working on the last one this week of Christmas, 2013. I am getting much better results as I get near the end.  The last module I submitted was rated 5 out of 5 in all categories. It was a rock mix that started out with an acoustic guitar and vocal, and built up to a full slammin’ drum, bass, Hammond B3 and electric guitar screamer, then came back down again. Quick difficult to get right, actually, due to the extreme dynamics.

Why take a class like this?  We project studio recording types tend to work in isolation, and getting feedback from other professionals really helps polish our chops. In my case I thought I was pretty good at mixing, but I found out I really had a lot of room for improvement (don’t we all?).

First of all, if you are not in the field of audio engineering you might ask what is mixing in the first place? A mix engineer takes recorded instrumental and/or vocal tracks from a session and makes adjustments in level or loudness, frequencies or tones, and sometimes adds to or takes away portions of the recording.  If you listen to raw recorded tracks often the sound is awful, with instruments, electric guitars especially, competing for the same sonic space. The role of the mixing engineer is to bring balance and musicality to the overall sound of a song. This can involve raising or lowering the loudness or level of tracks, adding EQ (adjustments to tone), compression (lowering dynamic range in order to raise the overall punchiness of a track), adding reverberation, and sometimes leaving out sections of a recorded track, or an entire track, if it did not fit well into the mix.  The mix engineer can take it further if the producer desires it by applying technical fixes to intonation (bringing an out of tune note back into proper tuning), fixing timing or rhythmic problems by editing sections of audio, removing clicks or pops that may have gone unnoticed, and in general just polishing up the tracks.

In particular I have learned though experience something that is often stated by engineers, but may go unappreciated until you try it.  That is, very small adjustments in EQ and volume can make a huge difference in how a track melds into the overall mix. In the field of Homeopathy (an alternative medical practice that has been around for 150 years or so) there is the principal of the minimum dose of medicine.  When applied correctly, the minimum dose is often more effective than drugs given in larger amounts (think vaccination, for example, where a very small amount of what could ail you can be preventative of the same illness).  I think this principle of the minimum dose can be applied to music as well.

We measure changes in loudness in units called “decibels”, or dB.  These are relative measures of loudness when applied to sound as it reaches your ears. Our ears are incredibly sensitive to changes in both loudness (in dB) and EQ (equalization or adjustment of the relative loudness of certain frequencies or tones).  Sometimes all it takes for a track to “gel” in the mix is as little as 1/2 of a dB, or a slight bump or dip in the center frequency or gain of an EQ knob.  Before I took this course I had a hard time discerning these differences. Now I am amazed at how much better my tonal  comprehension is as I compare my work to the feedback received from my submitted mixes.  Yes, that egg shaker was a bit loud, I can hear that now.  Let me pull that fader down just a smidge!  Ahh!  The magic of the minimum.

The same principle applies to reverb, something which I have always loved to have in my mixes.  I always thought of reverb as an effect, something to bring attention to a track.  I guess that comes from playing and recording a lot of acoustic instruments, such as violin, which often sounds lovely drenched in reverb.  And hey, it can smooth over mistakes and intonation problems (secret, don’t tell anyone!). But a high dose of reverb can also make a mix sound muddy.

I have learned how to add just a touch of reverb to a vocal to get it to gel. If you can hear the reverb, if it stands out, maybe that is not what you really want.  So turn down the reverb send for the track, and then listen. Does the vocal still sound sweet?  Then take it away altogether. The minimum dose is often the amount of reverb that makes the track gel or fit into the musical space of the other instruments, such that when you take it away you notice its absence, but only when you take it away.  This is not to say that you cannot use reverb as an effect, but too much makes for a muddy mix more often than not.  This is another important lesson learned.

If you are a budding recording musician or engineer, you might want to check out this class at www.audiomasterclass.com.  The course is not cheap but I have found it to be extremely beneficial. Now turn up that kick drum  1 dB and you will have it!

Hybrid Happens Here

Recently Mix magazine published an article, “Analog Rules”, describing the audio production methods used by several top producers and engineers. Key to these methods is the combination of analog and digital techniques. This is nothing new, but what was interesting was the renewed interest in tape as key component. Tape imparts a unique sound to tracks as a result of many factors including saturation (a kind of pleasing distortion, often termed musical distortion), subtle variations in the speed and imperfect contact with the heads, as well as the influence of discrete analog electronics (resistors, capacitors, transformers, etc.) on the signal path.

Now in 2010 digital audio has improved so much that in conjunction with good analog outboard gear (preamps, compressors, eq) it sounds very good indeed. However I recently acquired a 2-track SONY MCI JH-110 1/4″ tape deck from a Nashville engineer, Chris Mara, who runs Welcome to 1979.com, a primarily analog recording studio. Using this deck as a final link in the mastering chain has given me one more tool. I can take a previously recorded digital mix, bounce it to tape, and bring it back into the DAW, and compare it to the original mix. Often (although not always), I like the added nuances that tape provides. I describe the tape sound as a kind of “rounding and smoothing” of the audio, especially for transients. Sometimes this dulls the mix, in which case if I like the original digital version, I will keep that. But more often than not I prefer the tape version.

Tape as a production medium was nearly pronounced dead 20 years ago as digital tape and later digital audio workstations (a.k.a. “souped up computers with professional audio interfaces and sequencing software”) gained acceptance. Digital was welcomed for its improved editing, low noise, and relatively lower cost compared to tape. However digital audio has had from the start its detractors, including such notable musicians as Neil Young, and top flight engineers such as Bob Clearmountain, according to the Mix article.

I also track directly to tape and dump the tracks into the DAW. In that case I usually do not have to bounce in the final master stage. However with the cost and extra work of using tape, and the fact that many of my clients are amateur musicians or part-timers who are not always fully prepared, I tend not to use this technique for tracking as often as I might.

Combining tape and digital is the same approach that many engineers, including those mentioned in the Mix article, are using. Nice to know that this hybrid approach is working for so many others. I certainly like it, and will continue to employ it in my own music production.

Otari MX-7800 Tape Deck

Mixing and Mastering Workflow

When mixing and mastering, there are many ways to approach the workflow, especially when working both inside and outside the “box”. In this case my “box” is an Intel Quad Core, 4 Gig, XP Pro system using SONAR 8.5 PE for tracking and mixing (and occasionally Reaper 3), and Wavelab 6 for mastering and CD production.

Here is my workflow:

Using SONAR, where I originally laid down the tracks, I mix out through my console and outboard and then back into SONAR, and export the final stereo mixdown to a project \Mix folder. The mix version retains the original bit depth and sample rate, usually 24/48 or 24/88.

In Wavelab I load each mix file separately for mastering, create the master section fx chain, and save that as a per-song preset. I will set the loudness using the WL meters, or the meters in UAD Precision Limiter, set to K-14. I also use UAD Precision Maximizer, or possibly the Fairchild 670 plug, to get the sound where I want it in terms of loudness and clarity, warmth, etc.

Then I render out to same bit depth, with final gain set for the target avg RMS (I use the Global Analysis tool all the time to check this), generally -14 DBFS plus or minus a db. No dither yet. Note that this loudness level is average perceived loudness, set to less than today’s pop music standard, i.e. it retains much of the original dynamic range and is still loud enough to sound good on CD compared to many other similar tunes. As I am mostly doing acoustic, folk, Celtic, electronica, country and bluegrass, i don’t feel the call to squashing the sound just to make it competitive for radio play, as has been the trend in recent years. Anyway…..

Each of these 24-bit mastered files is kept in a \Master folder in the project subdirectory, so I can keep track of when I last rendered out a final version. At any time I can go back to the mix versions restore the preset for the tune, and work it some more if I need to.

I create a CD project montage in Wavelab, set order of the tunes, do the fades (top and tail), spacing, and only then apply dithering to the final rendered stereo file and basic audio CD file. That way I can adjust final levels in the montage if I want to before dither.

It might sound like a lot of work but it gives me pretty good control over each song, without having to render the entire CD montage with all of the original per song plugs, which takes a while. The final render only applies dither.

After the final render of the project I can then burn reference CD’s, which i listen to in a variety of contexts (home stereo, car stereo, iPod). Once its all good, a final master is burned onto a high quality CD-ROM, such as Apogee or Tayo Yuden, at 8X speed (which my DAW seems to like better than the often quoted 1 or 2X speed).

Phase Cancellation Examples

Here are the clips I referred to in my previous post about the effects of partial phase cancellation when recording vocals with two mics and two artists. The first clip shows the results of two tracks, each with the vocal mic but the bleed from the second mic is retained. The second clip shows what happens when I edited out the bleed on the second mic track.

PhaseExample_In

PhaseExample_Out

The Setup

Phase Cancellation

Just finished a voice over recording session for a radio play. The play will be on an upcoming CD release for the heavy metal group, Butcher. The voice over was performed by two actors spaced 3 feet apart, facing each other. The large diaphram condensor mics were set to a cardioid pattern, but of course there was considerable bleed between the two.

I used a U87a on the female actor’s voice, and a Michael Joly modded MXL V67 on the male’s voice, each recorded to separate mono tracks in SONAR. The U87 was clear and powerful, full of presence, as I expected, but the sound from the V67 was thin and hollow sounding, which I noticed only when playing both tracks back together. This was not what I was expecting from the Joly modified V67.

Then it hit me! The bleed into the U87, being 3 feet away, was introducing a 3 ms partial phase cancellation for the male actors voice, when listening to the U87 track.

Its about 1 millisecond delay per foot of separation, that’s recording 101 for you. And yes it was considerably noticeable. However when I muted the U87 track and listened to the male actor voice soloed, it sound very good. Not U87 good, mind you, but much better. Considering the V67 is a $300 mic (after the Joly mods), it holds up well as a 2nd stringer to the U87.

So rather than try a different mic I just dealt with the phase cancellation in the DAW, when mixing. Its a simple matter to edit the tracks to eliminate the bleed, as long as the two voices are reading distinct parts and not talking over each other. Fortunately that is the case for this script, just a few places where you will hear both voices together.

Being out of phase is something that recording engineers really need to pay attention two, especially for vocals, when recording with multiple mics. Having better isolation also helps, but I did not have the room nor the available “gobos”. I might have used one of Ethan Winer’s Real Traps Portable Vocal Booths in this situation, but I wanted the talent to face each other as they were carrying on a “conversation”.

I will post some examples of this partial phase cancellation for anyone to hear, so you know what I mean.